Note: The following instruction has been tested to be working in Stable Diffusion 1.5 checkpoints, not xl checkpoints.
How to change art styles with Multi ControlNet using Stable Diffusion Webui?
1. If you don’t have Stable Diffusion Webui installed, go to install stable diffusion webui on Windows.
2. If you don’t have ControlNet extension installed, go to install ContolNet extension and download models for Stable Diffusion webui.
3. Go to ControlNet -v1-1 to download “control_v11f1p_sd15_depth.pth” and put it in the directory “extensions\sd-webui-controlnet\models.”
4. Go to T2I-Adapter to download t2iadapter models, such as “t2iadapter_color_sd14v1.pth” and “t2iadapter_style_sd14v1.pth”. Copy them to “extensions\sd-webui-controlnet\models” directory.
5. Run “webui-user.bat” to open Stable Diffusion Webui in a browser at http://127.0.0.1:7860/.
6. Click Settings tab and Select ControlNet at left panel. Change Multi ControlNet to 2 or 3. Refresh your Stable Diffusion Webui.
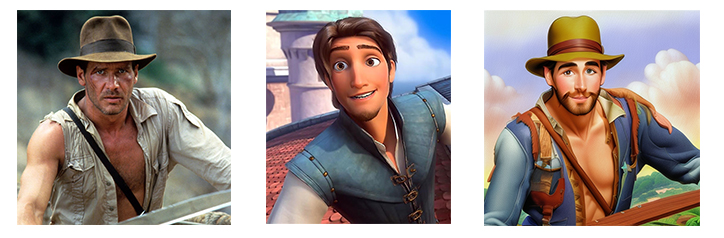
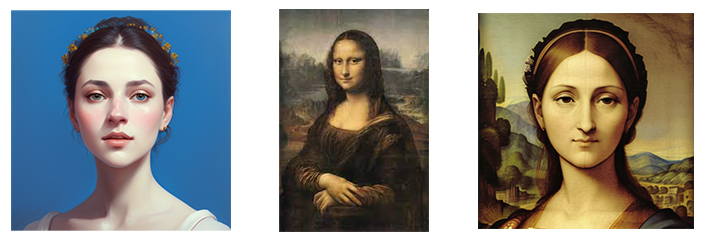
7. In txt2img tab, expand ControlNet area. Load a photo in “ControlNet Unit 0” tab. Check “Enabled” underneath. Change Control Type to be “Depth”.
8. Click “ControlNet Unit 1” tab, load an image with an art style in. Check “Enable” underneath.
9. In the Preprocessor, select “t2ia_style_clipvision” from the dropdown. In the Model, select “t2iadapter_style_sd14v1” from the dropdown.
10. You don’t have to enter prompt, Change Batch count to 4.
11. Click Generate button.