How to install AnimateDiff in ComfyUI on Windows?
1. If you haven’t installed ComfyUI, go to install ComfyUI on windows. Following the instruction, you should have ComfyUI-Manager installed as well.
2. Run “run_nvidia_gpu.bat” or “run_cpu.bat” to open ComfyUI in a browser at http://127.0.0.1:8188/.
3. Click Manager button in the right panel. The ComfyUI Manager Menu opens. Click Customer Nodes Manager button, a window with a list of customer nodes pops up.
4. In this window, search for “animatediff.” Select “AnimatedDiff” by ArtVentureX and click Install. When the installation finishes, click “RESTART” to restart ComfyUI.
5. Go to download animatediff motion models, such as “mm_sd_v15_v2.ckpt,” etc. Put them at “ComfyUI\custom_nodes\comfyui-animatediff\models” directory.
6. On the same page, download motion lora models, such as “v2_lora_PanLeft.ckpt”, “v2_lora_PanRight.ckpt” … “v2_lora_ZoomIn.ckpt” and “v2_lora_ZoomOut.ckpt” total eight motion lora models. Put them at “ComfyUI\custom_nodes\comfyui-animatediff\loras” directory.
7. Go to download VAE model, and put it at “ComfyUI\models\vae” directory.
8. To test the installation, go to comfyui-animatediff workflows. In this page, there are a few animatediff workflow examples. Download simple.json and lora.json.
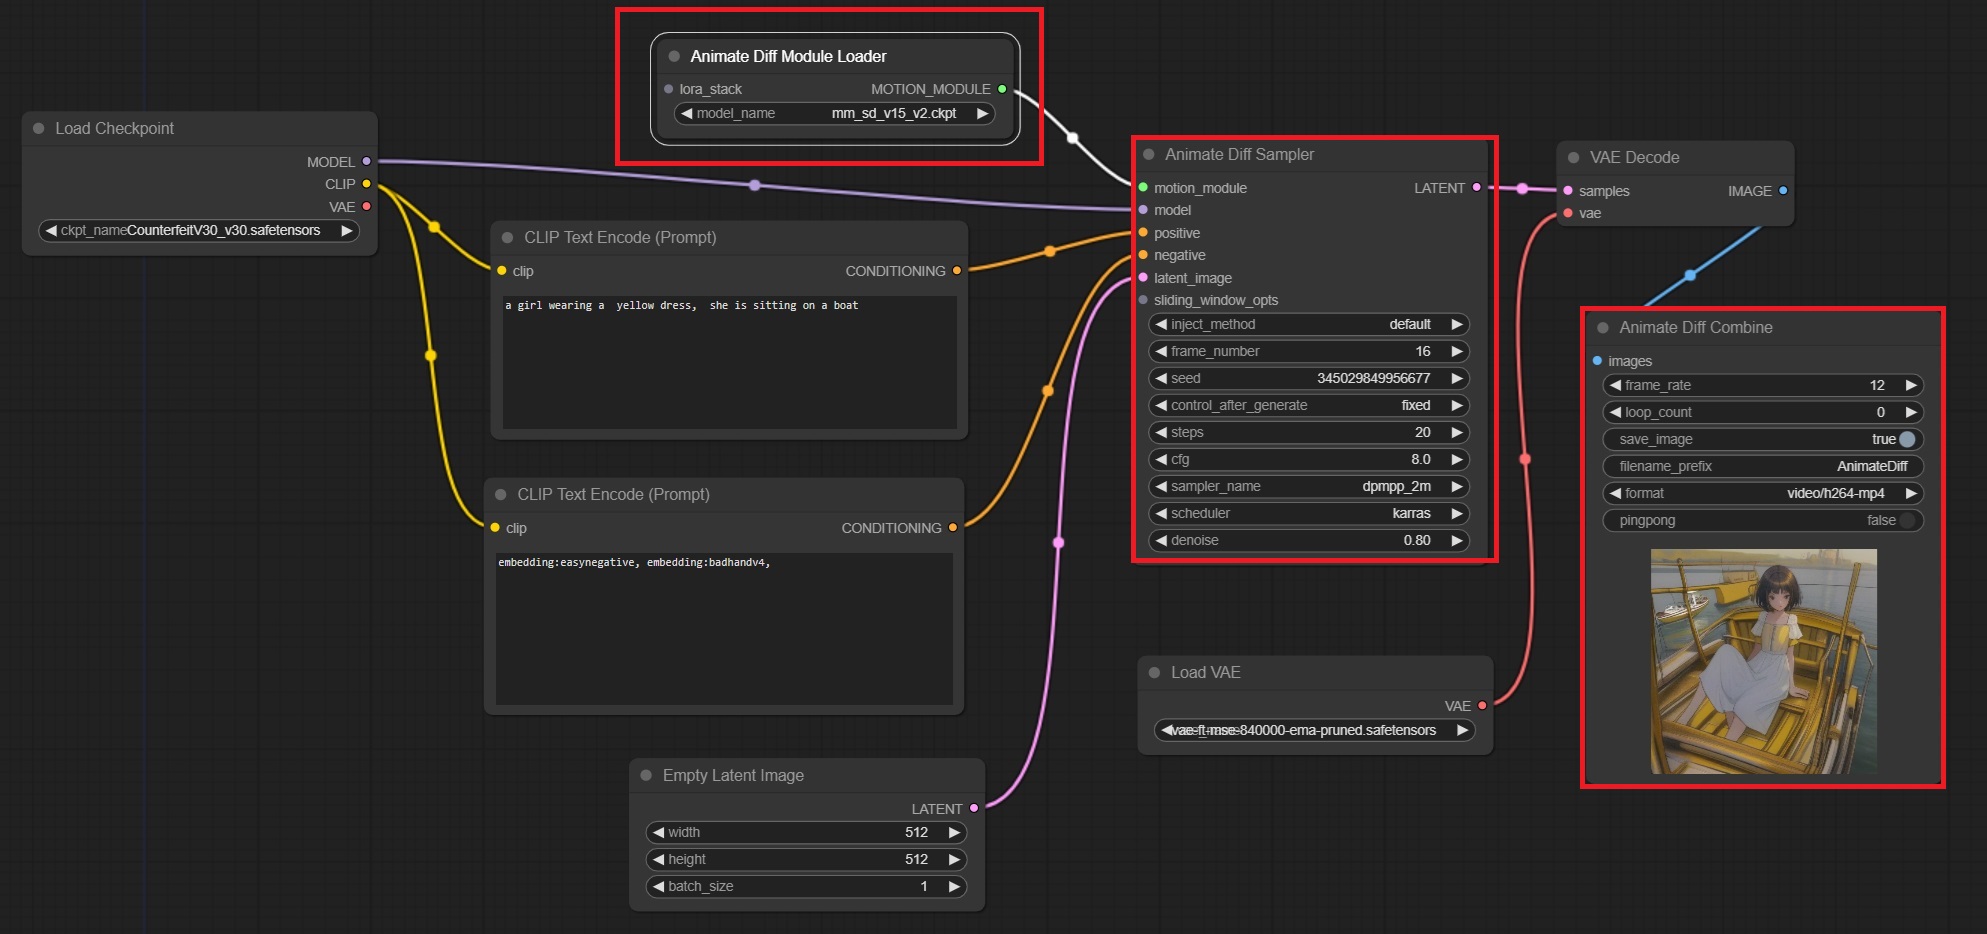
9. Let’s look at simple.json first. It is a txt2img workflow. Drag simple.json to your ComfyUI in the browser. There are three nodes used for AnimateDiff (See the image above). One is Animate Diff Module Loader, the second is Animated Diff Sampler. The third is Animate Diff Combine. In Animate Diff Module Loader node, select a motion model, such as “mm_sd_v15_v2.ckpt.”
10. To run the workflow, in Load Checkpoint node, select a checkpoint in your “ComfyUI\models\checkpoints” directory. In Load VAE node, select the VAE model you downloaded. Change the prompt to describe your video.
11. Click Queue Prompt button to run the workflow. Monitor the progress in the ComfyUI console.
12. When it finishes, a new video is showing at Animate Diff Combine node. The output image is also saved at “ComfyUI\output” directory.
13. Let’s look at the second workflow lora.json. It is an example to use motion loras which let you animate camera movement, such as zoom-in, zoom-out, pan-left or pan-right, etc. Drag lora.json to your ComfyUI in the browser. In this workflow, there is an additional node Aminate Diff Lora Loader. In this node, select a motion lora model. (See image here)
14. Next you select a checkpoint in Load Checkpoint node. Select the VAE mode in Load VAE node. Select an animatediff motion model in Animate Diff Module Loader node. Change your prompt.
15. Click Queue Prompt button to run the workflow. Check the result and adjust your settings to get an ideal output.
What are the differences between AnimateDiff and AnimateDiff-Evolved?
AnimateDiff is a customer node to let you run AnimdateDiff in ComfyUI. AnimateDiff-Evolved is an improved AnimateDiff integration for ComfyUI. It requires the installation of additional customer nodes such as ComfyUI-Advanced-ControlNet and ComfyUI-VideoHelperSuite.