What is ComfyUI?
ComfyUi is a web-based application to generate images and videos using Stable Diffusion technology. It is a framework to integrate modules such as ControlNet, IP-Adapters, AnimateDiff to work together in one workflow.
How to install ComfyUI on Windows?
1. Go to 7zip to download an installer for Windows. Run the installer.
2. Go to ComfyUI GitHub download page. Read the release notes and select a 7z file to download. Right click the file and use 7-Zip to extract it. The root directory is “ComfyUI_windows_portable.”
3. Go to “ComfyUI” folder, rename “extra_model_paths.yaml.example” to “extra_model_paths.yaml.” Open a text editor to edit this file. Uncomment the section for comfyui. Change base_path to the path of your “ComfyUI_windows_portable\ComfyUI” directory.
4. Next is to install ComfyUI-Manager. It is an extension for you to install and remove various custom nodes and models. On Windows, the easy way is to get install-manager-for-portable-version.bat and put it at “ComfyUI_windows_portable” directory. Double click to run it. This will add “ComfyUI-Manager” folder at “ComfyUI\custom_nodes” directory.
5. Download Stable Diffusion models from Huggingface and civitai. For example, go to Counterfeit-V3.0. Download “CounterfeitV30_v30.safetensors“ file. Copy this file to your “ComfyUI\models\checkpoints” directory.
6. Now let’s run ComfyUI. Under “ComfyUI_windows_portable”, there are two batch files, “run_cpu.bat” and “run_nvidia_gpu.bat.” Run one of them for your Windows. A console window will show the status of launching. Moments later, ComfyUI runs in your browser. The default url is http://127.0.0.1:8188/.
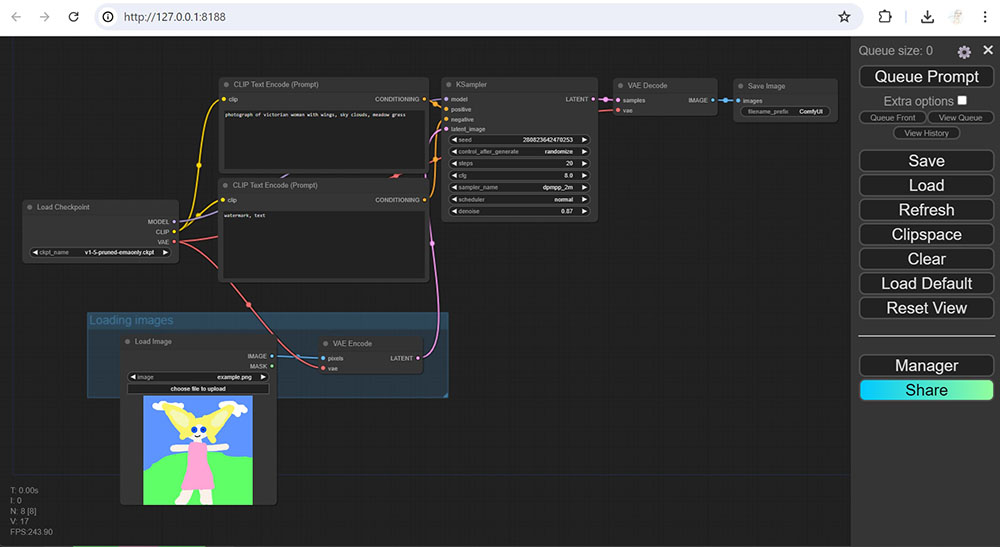
7. You can test your installation by running a workflow, which is a json file or a PNG image containing the parameters to generate images or videos. Go to ComfyUI_examples, and click Img2Img. Drag the screenshot image on that page to your ComfyUI in the browser.
8. In Load Image node, load an image from your local drive. Note the default input images are located at “ComfyUI\input.”
9. In Load Checkpoint node, select a checkpoint that available in the checkpoints directory.
10. Click Queue Prompt button at the top of right panel. The workflow starts to run. Monitor the progress in the ComfyUI console. You can also get the status by looking at a green edge or red/pink edge around a node in ComfyUI interface.
11. When it finishes, a new image is showing at Save Image node. The output image is also saved at “ComfyUI\output” directory.
What are the differences between Stable Diffusion WebUI and ComfyUI?
Both Stable diffusion WebUI and ComfyUI are web-based applications to generate images and videos using Stable Diffusion technology. WebUI is organized by tabs and easy to navigate. It is good for beginners to explore different features in Stable Diffusion. ComfyUI consists of connected nodes for various features. Nodes work together to carry out complicated tasks and can be saved as a workflow (similar to a script in programming). The biggest advantage of ComfyUI is that users can save and re-use the workflows, while WebUI cannot.