How to install ControlNet ComfyUI on Windows?
1. If you haven’t installed ComfyUI, go to install ComfyUI on windows. Follow this instruction, you should have ComfyUI-Manager installed as well.
2. Run “run_nvidia_gpu.bat” or “run_cpu.bat” to open ComfyUI in a browser at http://127.0.0.1:8188/.
3. Click Manager button in the right panel. The ComfyUI Manager Menu opens. Click Customer Nodes Manager button, a window with list of customer nodes pops up.
4. In this window, search for “controlnet.” Select “ComfyUI’s ControlNet Auxiliary Preprocessors” and click Install.
5. When the installation finishes, click “RESTART” to restart ComfyUI.
6. Go to ControlNet v1.1 to download ControlNet models, such as “control_v11p_sd15_scribble.pth”, “control_v11p_sd15_openpose.pth,” “control_v11p_sd15_lineart.pth,” “control_v11p_sd15_softedge.pth,” “control_v11f1e_sd15_tile.pth,” etc. Put them at “ComfyUI\models\controlnet” directory.
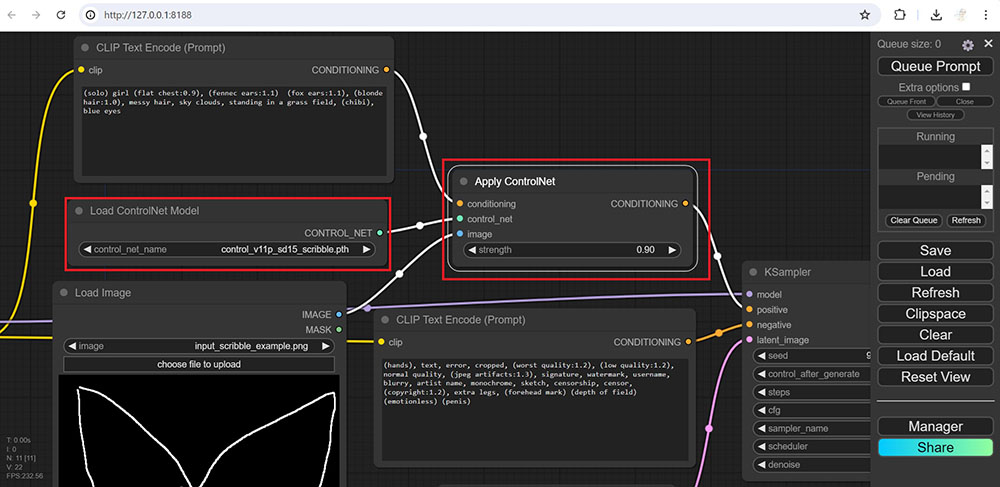
7. To test the installation, go to ComfyUI_examples, and click ControlNet and T2I-Adapter. In this page, there are a few ControlNet examples. Drag the Scribble ControlNet workflow image to your ComfyUI in the browser. Meanwhile, download the scribble image beneath and save it at “ComfyUI\input” directory.
8. Let’s look at the nodes in the workflow. There are two nodes used for ControlNet (See the image above). One is Load ControlNet Model, the other is Apply ControlNet. In Load ControlNet Model node, select “control_v11p_sd15_scribble.pth.” If you don’t see any data from the dropdown, click Refresh button in the right panel to get the ControlNet models showing up.
9. Sometimes, you want the third node to use ControlNet, which is a preprocessor for a particular ControlNet model or an all-in-one preprocessor.
10. To run the workflow, in Load Checkpoint node, select a checkpoint that compatible with SD1.5 in your “ComfyUI\models\checkpoints” directory.
11. In Load Image node, click choose file to upload button to load the scribble image you downloaded.
12. Click Queue Prompt button to run the workflow. Monitor the progress in the ComfyUI console. Note during the run, there are a few annotators downloaded. They are saved at “ComfyUI\custom_nodes\comfyui_controlnet_aux\ckpts\lllyasviel\Annotators.”
13. When it finishes, a new image is showing at Save Image node. The output image is also saved at “ComfyUI\output” directory.
14. Now you can explore various ControlNet models.