What is IP-Adapter?
IP-Adapter, or image prompt adapter, is a stable diffusion add-on to generate images using image prompts. It is used for mixing styles (style reference, character reference). It can be combined with ControlNet for precise control of the output. See details at Huggingface.
How to install IPAdapter in ComfyUI on Windows?
1. If you haven’t installed ComfyUI, go to install ComfyUI on windows. Following the instruction, you should have ComfyUI-Manager installed as well.
2. Run “run_nvidia_gpu.bat” or “run_cpu.bat” to open ComfyUI in a browser at http://127.0.0.1:8188/.
3. Click Manager button in the right panel. The ComfyUI Manager Menu opens. Click Customer Nodes Manager button, a window with a list of customer nodes pops up.
4. In this window, search for “ipadapter.” Select “ComfyUI_IPAsapter_plus” by cubiq and click Install. When the installation finishes, click “RESTART” to restart ComfyUI.
5. Go to ComfyUI_IPAdapter_plus GitHub page. Scroll down to Installation section. Download CLIP-ViT-H-14-laion2B-s32B-b79K.safetensors and CLIP-ViT-bigG-14-laion2B-39B-b160k.safetensors. Rename the downloaded files to the names shown here. Put them at “ComfyUI\models\clip_vision” directory.
6. Go to huggingface IPAdapter page to download ip-adapter_sd15.safetensors, ip-adapter-plus-face_sd15.safetensors and other ip-adapter models listed on the page. Put them at “ComfyUI\models\ipadapter” directory.
7. (Optional) If you are going to work on face generation or face fixing, you need to continue to install insightface and download lora models by following the instruction in the installation section of GitHub page.
8. To test the installation, go to ipadapter_plus examples. In this page, there are many ipadapter json files, i.e workflows. Click ipadapter_simple.json and download it. Drag the file to your ComfyUI in the browser.
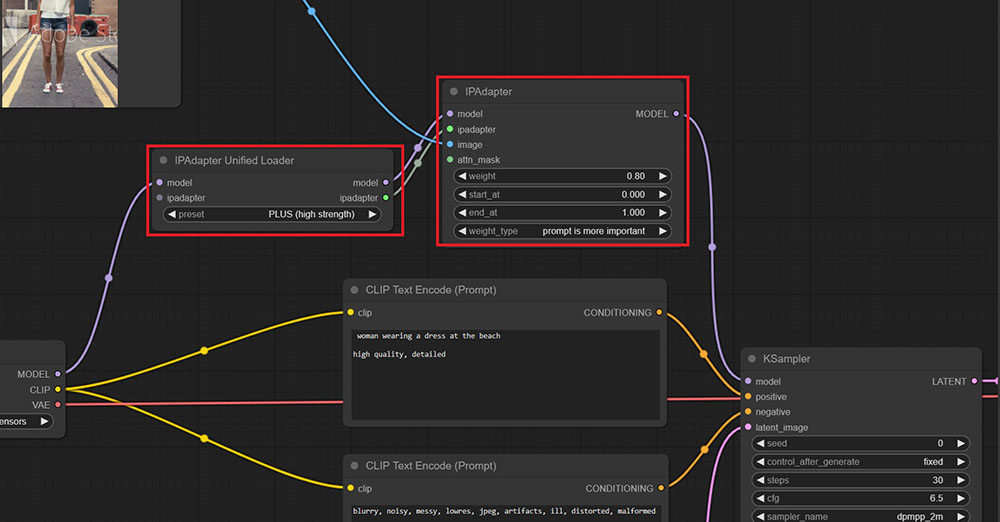
9. Let’s look at the nodes in this workflow. There are two nodes used for ipadapter (See the image above). One is IPAdapter Unified Loader, the other is IPAdapter. Note sometimes you can use IPAdapter Advanced node to exchange with IPAdapter node.
10. To run the workflow, in Load Checkpoint node, select a checkpoint in your “ComfyUI\models\checkpoints” directory. In Load Image node, click choose file to upload button to load an image. Change the prompt to describe your image.
11. Click Queue Prompt button to run the workflow. Monitor the progress in the ComfyUI console.
12. When it finishes, a new image is showing at Save Image node. The output image is also saved at “ComfyUI\output” directory.